Anchoring Learning Through Documentation
 Background in UDL
Lately, I have been trying to use UDL principles to increase the use of my visual supports in the classroom. A typical anchor chart is provided by the teacher to serve as a reference to steps or key ideas with a standard being taught. However, what if a documentation approach is used to anchor the next steps students will take on their own. Educators know the power of “I do” modeling. Then we guide students to a “We do” stage. What would happen if the teacher captures these phases of instruction in the classroom?
Using Standards to Guide Goals
My goal was to increase students ability to grasp key ideas from text and provide support from the text to explain thinking. I wanted to model CLOSE reading strategies with students in a way that would allow them to learn deeply from text. The goal was to show, do together, and release students to be independent with growth in CLOSE reading. These techniques are taught every year, but how can a teacher use visuals to support the process in a rich, detailed approach.
Key Ideas and Textual Support in Indiana Standards
| 5.RN.2.1 | Quote accurately from a text when explaining what a text says explicitly and when drawing inferences from the text. |
| 5.RN.2.2 | Determine two or more main ideas of a text and explain how they are supported by key details; summarize the text. |
| 5.RN.2.3 | Explain the relationships or interactions between two or more individuals, events, ideas, or concepts in a historical, scientific, or technical text based on specific information in the text. |
Define the Tool
 To help my students with the concept of three phases of CLOSE reading, I decided to use the normal anchor chart from Smekens. This chart was blown up, laminated, and added to the classroom. Just adding the chart is helpful. Students learn that a first phase read is like putting on your glasses. You take a look at the text and give it a read through. Then the second read is related to a microscope. You look very closely at the text and study it. During this phase, you annotate key ideas and discuss. Next, you associated the third read with the telescope. You take a broader view of the text, write about the text, and respond to the text with evidence.
Capturing the Process in Visual Documentation
What developed next in my classroom was the need to document the three phases from the modeling! Yes, it was becoming obvious that going beyond the “anchor” chart was necessary so that our process lived in the room. What transpired next was an improvement in my visual supports for learning!
Phase 1 & 2 ClOSE Reading Docmentation
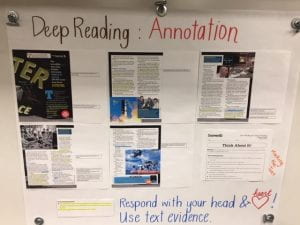
We used a Storyworks article. When we were annotating the text together, I used Kami to model the annotation. Later, I printed off the annotated text and put our work in order of how we went through the CLOSE reading stages.
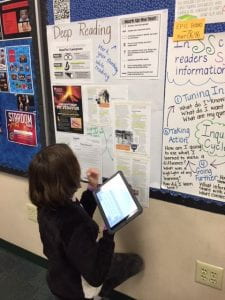
Students were able to go back to a CLOSE reading documentation chart when trying the process on their own. The kids were able to work on their third phase written response with the “We do” modeling available.
Phase 3 Documentation

Written response that we did together was later printed and used to help students for future reading passages. Notice how checklists were added to the anchor charts.
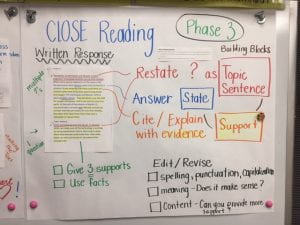
Organizational writing structure for the response was documented on one of our practice activities.
Tips for Taking this Small Move
- Keep your traditional anchor chart.
- Find a way to document the mini-lesson. It can even happen after it is done.
- Use the documentation to review the lesson from the day before. The learning is visible and easy to revisit.
- Allow students to approach your documentation during “You do” phase of learning.
- Add checklists to charts when it makes sense for the skill.
- Make the learning of a skill visible more than just during the introduction of a skill.
- Can students use visuals to explain what they are learning?
- Can students make personal learning goals due to the documentation charts in the classroom?
Taking this Idea to Leaderhip
During Walkthroughs, pay attention to what is on display. What documentation is available for students? Do the visuals provide scaffolding support? Can a student easily revisit previous learning? It is an opportunity to coach teachers to think about options that support learning. You might hear me say, “I wonder if you…” Remember a small move can lead to BIG change in a classroom environment over time.
 A responsive teacher listens to the needs of students. With the work I have been doing with the UDL guidelines, I had the vision of helping students make meaningful goals. However, in the process we built community and helped with engagement too. When you begin working on one area of the guidelines, it truly leads to developing others.
 Representation in UDL
 My classroom is guided by student led book selections. My goal is to get students to read 20 books during the school year, so I do the same (if not more). Choices are possible because I am comfortable with the books available to my students. I know the books. Luckily, this opens the world up to my students. My students can read independently or form book clubs. Then the true beauty of the reading life unfolds when I can confer with readers on their books. Students know when you are truly a reader. They pick up on the number of books you can dialogue with them on. They trust you. When you recommend a “next” read, they listen. Also, when you conference with a student on a book title you have not read, and then you read it as a result. You grab them in a way they cannot help but be captivated by. You let students know they matter. It has been a joy to see this small choice in the beginning my career unfold into relational beauty with my students. I look forward to sharing with them the books I read over break.
 Stats on David Wolf:

 Part of me wanted to immediately start the teacher drill of questions when he came to me with his rather weak proposal. What are you going to do with that? Why do you want to use the Sphero? Do you have a goal in mind? However, I knew better because this particular student struggles to find a passion for learning. It was not my time to get in his way and create obstacles. I needed to let him gain an interest in a technological tool.
 Dr. Deb Lecklider, Director of EPPSP at Butler University,
  Anila Dinn, Associate Vice President of Human Resources at Butler University
 Tina Seymour, Educational Consultant,
  Lauren Franklin, Crispus Attucks High School Principal