September 12

Digital Mentor Text for Advancing “Thinking While Reading”

Use Digital Text to Grab Readers!

As a fifth grade language arts teacher, I have two goals.  One, I want to model great thinking while reading.  Second, I desire to showcase engaging novels that students will desire to read.  In the digital format of instruction right now, I desired to use my strategies of growing readers while still helping virtual learners too.

My blog today will feature how I have used mentor text, show you a layout for presenting, and help you see how to bring this all together in your LMS, particularly Canvas.

Start with using the Libby app to locate text. Libby is another version of the Overdrive app that is available with your public library card.  It is an excellent resource for mentor text and then showcasing for students where to find the book for access, especially right now with learners at home.

Libby App

Locate this app and add to your device.  Login using your Public Library Card information. Make sure to only use a small portion of the text so that you are observing copyright. Here is an article that is helpful on the topic of copyright.

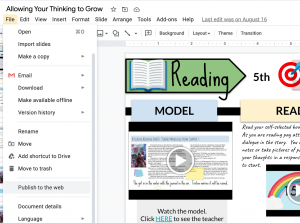
The next step in the process is to pick the section of the book from which you want to model thinking.  While working with the pages on Libby, I added Stickies, a feature on MacBook Air that looks like Post-It notes. However, you could take screen shots and add text my editing pictures.  The method chosen allowed me to model what students could do with Post-It notes in their own books. The screen shots were added to the Google Slides presentation that I was building for modeling and anchor charts. I also added the book cover to the presentation slides to give visual cues to students for remembering the book. Once the pages were set up in the presentation, I was ready to make my video for modeling.

To obtain a copy of this lesson to try with students or use the frame to recreate your own lesson, click here. My lesson opening frame was motivated by @nadinegilkison. I appreciated the model, read, respond set up for the first slide.  To ideate the plan, I have built modeling sections (light blue), sections for readers (light yellow), and responding and reflecting (light purple). The presentation pattern is being used in all of my digital lessons for reading and writing.  Predictability for students is highly important for routines. In Universal Design for Learning, we want to help students navigate digital resources.  You will also notice a timer that is used with students to track reading on their own.  On the Canvas page, written directions are also provided to summarize the lesson presentation.  Rubrics are valuable to add to your LMS to help with guiding reflection and goal setting.  You will see reflection built into the pedagogy of the closing of each lesson.  

Finally, how do you pull this all together for your LMS and easily distribute to students in the classroom or virtual students?  Learn to use embed code in Canvas.  Your students will be able to access your presentation right within the Canvas page.

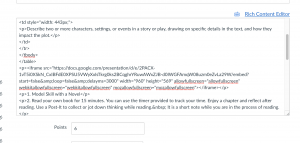
Using the “file” tab drop down to where it states, “Publish to the Web”.
Select “Embed” and then copy the code to take to your LMS like Canvas.
Click on the HTML editor hyperlink, which is right below the title of the assignment.
Paste the embed code into your assignment.

If you are interested in adding this link to your own Canvas course, you can find it in the Canvas Commons.  Best wishes to you in creating your digital mentor text lessons!  Feel free to share in the comments great ideas that have been working for you too.

March 2

Learning to Monitor Attention

All week, I looked out at one of my students and he was struggling to maintain a sense of focus.  When I see this, I make sure the student understands what they are working on during a check in.  I ask the student to tell me what he/she is focusing on and if he/she has a goal for the work time.  After doing this with my student, I went about helping  another student and he was playing with his pencil, chatting, tinkering with papers.  I would go back and work with him a few minutes to make sure he was getting into his assignment. He knew what to do and yet his attention kept wandering. This went on most of the week.  Sometimes we know the student needs a tool to learn to self monitor the issue.

Since I have been using UDL, I thought about what might be helpful for him to grow in his own regulating. How can he become an expert learner without assistance? I looked to the follow section of the guidelines:

UDL Guideline 9: Provide Options for Self-regulation

Checkpoint 9.1 – Promote expectations and beliefs that optimize motivation

 Provide prompts, reminders, guides, rubrics, checklists that focus on:
o Self-regulatory goals like reducing the frequency of aggressive outbursts in response to
frustration
o
o Elevating the frequency of self-reflection and self-reinforcements
 Provide coaches, mentors, or agents that model the process of setting personally appropriate goals that
take into account both strengths and weaknesses
 Support activities that encourage self-reflection and identification of personal goals

Attention Monitoring Plan

Together, in conversation about the actions I had been observing, we decided to make an attention monitoring “Level of Understanding” model.  He wanted something that he could have on his desk that would serve as a reminder of his attention.  He was familiar with the 0-4 levels from other uses in class.  With his collaboration, we created a great tool! He was a partner in the process.  Also, we agreed that I would tap the side of my temple and he could share his attention rating number on his fingers.  All of this could be done without really allowing others to know.  What would happen as a result of this plan?

0 1 2 3 4
You don’t know what is going on.  You are distracted. You are not getting work done. You know what to do, and you know you are distracted.  However, you don’t do anything about it. You work for short periods of time and then you are off task. Maybe you are talking to others. You are paying attention. You know what to do. You make progress. You might need a brain break if you start to drift. You might come to a point where you need to ask for help or get feedback on your work. You are working and not distracted. If people are doing things around you, you don’t notice. You are completely zoomed in. Time passes quickly when you are focused.

The Plan in Action

Using the focus chart really helped me think about my attention.  I like having the reminder in front of me.

-Benjamin

My student did such a great job getting out his tool during the week.  He did so unprompted by me.  He allowed me to check in with him on his attention number, which we were able to do quietly without talking about it. He used his hand to share his number.  The chart allowed me to prompt reflection later and praise his attempts at self-monitoring his focus. We are into the second week of the prompting tool and he still is using it. He shared that he thinks others might want to know about his tool.

Lesson Learned

  • Allow your kids to be in the process of developing a tool
  • Set a goal together
  • Use a “secret” reminder for rating
  • Reflect with the student on the process
  • PRAISE!

Try it with your students!

The attention chart is available for your to use and adapt with your own students.  When we work with students and come alongside them, they are very open to trying out new strategies.

Attention Monitoring Chart

Category: UDL | LEAVE A COMMENT
February 15

UDL and Learning Paths

Choice is an anchor to helping students become engaged in a topic.  As a teacher, there are standards which are necessary to the curriculum of your grade level.  Using your learning management system, in my case Canvas, can help you create a learning path for students with essential questions, goals, scaffolding, reflection, and flexibility in assessing the learning. This blog will feature a 5th grade social studies lesson using UDL Guidelines.

Essential Questions and Goals

Students need essential questions to understand what the inquiry of the lesson is for the topic.  It is also important that students know what their goal, “I Can” statement is for the lesson.  It is also appropriate to attach the standard being covered for students to see.

Goal: I can explain the impact the French and Indian War had on use of land in the colonies. I can explain the results of the war.

Standard: 5.3.8 Explain how the Spanish, British and French colonists altered the character and use of land in early America.

Scaffolding

When students are given a topic to explore, it can be helpful to provide a number of different resources to allow students to choose what path they want to take to gain understanding. A variety of modes are important and it is not necessary for students to complete all of the steps.

The first choice is a video that explains the French and Indian War.  The video link was sent to Edpuzzle so that I could add checks for understanding questions for students to answer while watching the video.  Edpuzzle will also provide me with data and which students used this method of instruction.

The second choice is a Brainpop video on the French and Indian War. Students can view the video and take the review quiz to see if they are understanding the information. Students are encouraged to revisit the information if they were unable to answer the questions correctly.

The third choice is scaffolded for students to decide what will be serve them.  There is a ReadWorks article for the students to read.  The student may choose to read on their own or they may select the video where I am reading the article to them and posing thinking questions as I go through the article.  It is up to the student to decide which method will serve them best.

The fourth option on the pathway relates to music of the time period. The song, “Yankee Doodle” was actually written by the British after the French and Indian War.  This option share lyrics and videos that show how the song that was supposed to be an insult on the colonists was actually used by the Americans during the revolution. Learning the music history can help with understanding the road to the American Revolutionary War.

Reflection using Levels of Understanding

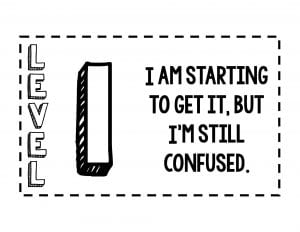
Students need to be taught, as developing expert learners, to reflect on their own understanding while in the process of learning. Levels of Understanding comes from Marzano’s work and for this learning pathway is designed to have students monitor their own knowledge of the topic. The main focus is on whether the student can answer the essential questions after choosing options on the pathway.


Assessing the Learning

Students can make a choice from an option board to share the learning they gained for the topic of the day. The options share a variety of methods for a teacher to check for understanding of the topic and the ability to answer the essential questions for the standard.

Choices (Choose one)

  1. Write a  paragraph explaining the conflict of the war.  Why was there a war? What were the results? What do people need to know about the war?
  2. Create a sketchnote of the events of the war.  How can you share the French and Indian War in visuals?
  3. Create a Flipgrid video of yourself explaining the French and Indian War. Why was there a war? What were the results? What do people need to know about the war.
  4. 3-2-1 Prompt
    Answer the following details in your journal or on type on the Notesapp:

    • Three things that they have learned from this lesson.
    • Two deep questions that they still have. (These cannot be yes or no questions).  Be prepared to ask the class your questions to lead a post learning discussion.
    • One aspect of class or the lesson that they enjoyed.


Administrator Look fors with UDL

What instructional shifts do we want to see classroom teachers making that are implementing UDL strategies?

● Intentional and proactive ways to address the established goals, learner needs, and the assessment plan.

● Establish a plan for how instructional materials and strategies will be used to overcome barriers and support learner understanding.

● A plan that ensures high-expectations for all learners and that the needs of the learners in the margins (i.e., struggling and advanced), anticipating that a broader range of learners will benefit.

● Multiple means of Representation:Teacher purposefully uses a variety of strategies, instructional tools, and methods to present information and content to anticipate student needs and preferences

● Expression & Action: Student uses a variety of strategies, instructional tools, and methods to demonstrate new understandings.

● Engagement: A variety of methods are used to engage students (e.g., provide choice, address student interest) and promote their ability to monitor their own learning (e.g., goal setting, self-assessment, and reflection)


Where are you with your understanding of UDL?

For more information the the UDL Guidelines, check out CAST. And don’t worry, one small move leads to big change!

Category: UDL | LEAVE A COMMENT
February 10

More Ideas for Making Anchor Charts Useful

Inference and Synthesizing

You might want to consider new ways of making your anchor charts and documentation interactive for your students. We are currently reading the novel, Ghost Hawk, for our interactive read aloud. For this novel we are also working on improving our ability to infer text information and sythesize an idea.  We are using the Smekens silhoutte approach to serve as a graphic organizer.

After reading sections of the book, I am giving the students a key question related to the book.  We are working together on using the organizer to prepare our thinking. The students view the question, create an organizer in their notebooks, and put down ideas alone for three minutes.  After the students have had time, we are sharing our ideas together. Currently, I have been modeling the thinking they are sharing on the whiteboard when we work as a group.  Students can add to their notebooks the collected ideas.

Next, we are thinking of a way to synthesize the ideas around the head.  Often we take the question and use it to guide our topic.  This process will help readers to prepare to write about the questions with key evidence from the text, which is a standard we are focusing on along with sythesizing.

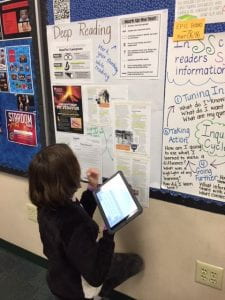
Working to make a documentation record of our work throughout the novel, I have been taking pictures of our whiteboard and adding the images to a SMORE for Ghost Hawk. On the SMORE, I have been able to model taking the graphic organizer work and turning it into written response.  This way, students can see the next steps they will be taking after they are comfortable with using the organizer.

In the image , you can see that some of the pages of this SMORE were printed to be available as a reminder of the work we have done in the modeling stage. A QR code can also be added so that the entire collection of examples can be available to the student. Make your documentation and anchor charts interactive so they are valuable to the students.

As we go through the process, students will be able to revisit our steps as they transition to doing the process independently.  All of these strategies continue to make learning visible which brings UDL guidelines into the classroom too.

Take a Look at our SMORE collection as we go through the novel.


February 9

Anchoring Learning Through Documentation

Background in UDL

Lately, I have been trying to use UDL principles to increase the use of my visual supports in the classroom. A typical anchor chart is provided by the teacher to serve as a reference to steps or key ideas with a standard being taught. However, what if a documentation approach is used to anchor the next steps students will take on their own.  Educators know the power of “I do” modeling.  Then we guide students to a “We do” stage.  What would happen if the teacher captures these phases of instruction in the classroom?

Using Standards to Guide Goals

My goal was to increase students ability to grasp key ideas from text and provide support from the text to explain thinking.  I wanted to model CLOSE reading strategies with students in a way that would allow them to learn deeply from text. The goal was to show, do together, and release students to be independent with growth in CLOSE reading. These techniques are taught every year, but how can a teacher use visuals to support the process in a rich, detailed approach.

Key Ideas and Textual Support in Indiana Standards

5.RN.2.1 Quote accurately from a text when explaining what a text says explicitly and when drawing inferences from the text.
5.RN.2.2 Determine two or more main ideas of a text and explain how they are supported by key details; summarize the text.
5.RN.2.3 Explain the relationships or interactions between two or more individuals, events, ideas, or concepts in a historical, scientific, or technical text based on specific information in the text.

Define the Tool

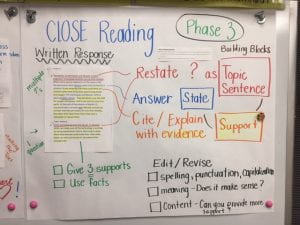
To help my students with the concept of three phases of CLOSE reading, I decided to use the normal anchor chart from Smekens.  This chart was blown up, laminated, and added to the classroom.  Just adding the chart is helpful.  Students learn that a first phase read is like putting on your glasses.  You take a look at the text and give it a read through.  Then the second read is related to a microscope.  You look very closely at the text and study it.  During this phase, you annotate key ideas and discuss. Next, you associated the third read with the telescope.  You take a broader view of the text, write about the text, and respond to the text with evidence.

Capturing the Process in Visual Documentation

What developed next in my classroom was the need to document the three phases from the modeling! Yes, it was becoming obvious that going beyond the “anchor” chart was necessary so that our process lived in the room.  What transpired next was an improvement in my visual supports for learning!

Phase 1 & 2 ClOSE Reading Docmentation

We used a Storyworks article. When we were annotating the text together, I used Kami to model the annotation. Later, I printed off the annotated text and put our work in order of how we went through the CLOSE reading stages.

Students were able to go back to a CLOSE reading documentation chart when trying the process on their own. The kids were able to work on their third phase written response with the “We do” modeling available.

Phase 3 Documentation

Written response that we did together was later printed and used to help students for future reading passages. Notice how checklists were added to the anchor charts.

Organizational writing structure for the response was documented on one of our practice activities.

Tips for Taking this Small Move

  • Keep your traditional anchor chart.
  • Find a way to document the mini-lesson.  It can even happen after it is done.
  • Use the documentation to review the lesson from the day before.  The learning is visible and easy to revisit.
  • Allow students to approach your documentation during “You do” phase of learning.
  • Add checklists to charts when it makes sense for the skill.
  • Make the learning of a skill visible more than just during the introduction of a skill.
  • Can students use visuals to explain what they are learning?
  • Can students make personal learning goals due to the documentation charts in the classroom?

Taking this Idea to Leaderhip

During Walkthroughs, pay attention to what is on display. What documentation is available for students? Do the visuals provide scaffolding support? Can a student easily revisit previous learning? It is an opportunity to coach teachers to think about options that support learning.  You might hear me say, “I wonder if you…” Remember a small move can lead to BIG change in a classroom environment over time.


January 9

What Do You Need to Best Understand Text?

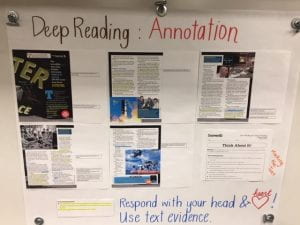
Representation in UDL

In Universal Design for Learning (UDL), we look for ways to help students find their best learning methods. In classrooms today, we have lots of options for multiple means of representation. Students need to be exposed to the potential of each option and figure out through trial and reflection what works best to receive information. Most classrooms have options for technology, but it does not mean that technology is the perfect fit for all students.  Also, students need to exposed to options regardless of learning ability. Strategies are not just for students with a learning need.  What works best in the classroom is the student deciding and the teacher presenting options.

What might it look like in a classroom studying social studies?

  1. A student might choose to use the digital version of the text on a device. However, even with this choice there is variability. One student may prefer to have the audio support play while following along, even if the reader is an effective reader.  The mode of audio and text meets two sensory needs with the auditory and visual being paired.  The mind of this student may feel more engaged with the information. Some students may only use the audio support to hear new vocabulary terms defined and spoken.  Others may just like the ability to read on the screen and not tap into any auditory features.
  2. A student may also like to use multiple forms of text.  Some students like to have the book text and the digital text available at the same time.
  3. Another type of student may find the digital format distracting and prefer the book alone.

Why is it important that we teach the options above?

Educators care about the learning process.  We need to get out of the way on the format preferences of kids. Clearly, educators have their own preferences of representation, but our role is to guide.  When kids are empowered with choice, we are setting them up for success in a digital society.  Devices and features of support are going to continue. Why not help students through trial and error to find the clarity they need to comprehend information?

Reflection is Key

After presenting the different options, students make a selection while working.  It is important to give space for discussion or a quick survey.

Ask:

  • What worked well? Why?
  • How do you know you learned more with the strategy you tried?
  • If you did not like the strategy you tried, what will you shift to using?  Why?