UDL and Learning Paths
Choice is an anchor to helping students become engaged in a topic. As a teacher, there are standards which are necessary to the curriculum of your grade level. Using your learning management system, in my case Canvas, can help you create a learning path for students with essential questions, goals, scaffolding, reflection, and flexibility in assessing the learning. This blog will feature a 5th grade social studies lesson using UDL Guidelines.
Essential Questions and Goals
 Students need essential questions to understand what the inquiry of the lesson is for the topic. It is also important that students know what their goal, “I Can” statement is for the lesson. It is also appropriate to attach the standard being covered for students to see.
Goal: I can explain the impact the French and Indian War had on use of land in the colonies. I can explain the results of the war.
Standard: 5.3.8 Explain how the Spanish, British and French colonists altered the character and use of land in early America.
Scaffolding
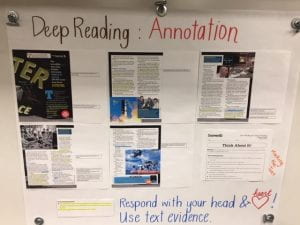
 When students are given a topic to explore, it can be helpful to provide a number of different resources to allow students to choose what path they want to take to gain understanding. A variety of modes are important and it is not necessary for students to complete all of the steps.
The first choice is a video that explains the French and Indian War. The video link was sent to Edpuzzle so that I could add checks for understanding questions for students to answer while watching the video. Edpuzzle will also provide me with data and which students used this method of instruction.
The second choice is a Brainpop video on the French and Indian War. Students can view the video and take the review quiz to see if they are understanding the information. Students are encouraged to revisit the information if they were unable to answer the questions correctly.
The third choice is scaffolded for students to decide what will be serve them. There is a ReadWorks article for the students to read. The student may choose to read on their own or they may select the video where I am reading the article to them and posing thinking questions as I go through the article. It is up to the student to decide which method will serve them best.
The fourth option on the pathway relates to music of the time period. The song, “Yankee Doodle” was actually written by the British after the French and Indian War. This option share lyrics and videos that show how the song that was supposed to be an insult on the colonists was actually used by the Americans during the revolution. Learning the music history can help with understanding the road to the American Revolutionary War.
Reflection using Levels of Understanding
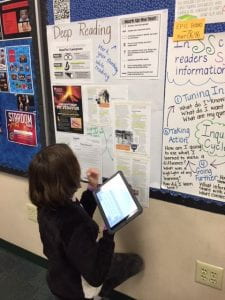
 Students need to be taught, as developing expert learners, to reflect on their own understanding while in the process of learning. Levels of Understanding comes from Marzano’s work and for this learning pathway is designed to have students monitor their own knowledge of the topic. The main focus is on whether the student can answer the essential questions after choosing options on the pathway.
Assessing the Learning
Students can make a choice from an option board to share the learning they gained for the topic of the day. The options share a variety of methods for a teacher to check for understanding of the topic and the ability to answer the essential questions for the standard.
Choices (Choose one)
- Write a paragraph explaining the conflict of the war. Why was there a war? What were the results? What do people need to know about the war?
- Create a sketchnote of the events of the war. How can you share the French and Indian War in visuals?
- Create a Flipgrid video of yourself explaining the French and Indian War. Why was there a war? What were the results? What do people need to know about the war.
- 3-2-1 Prompt
Answer the following details in your journal or on type on the Notesapp:- Three things that they have learned from this lesson.
- Two deep questions that they still have. (These cannot be yes or no questions). Be prepared to ask the class your questions to lead a post learning discussion.
- One aspect of class or the lesson that they enjoyed.
Administrator Look fors with UDL
What instructional shifts do we want to see classroom teachers making that are implementing UDL strategies?
● Intentional and proactive ways to address the established goals, learner needs, and the assessment plan.
● Establish a plan for how instructional materials and strategies will be used to overcome barriers and support learner understanding.
● A plan that ensures high-expectations for all learners and that the needs of the learners in the margins (i.e., struggling and advanced), anticipating that a broader range of learners will benefit.
● Multiple means of Representation:Teacher purposefully uses a variety of strategies, instructional tools, and methods to present information and content to anticipate student needs and preferences
● Expression & Action: Student uses a variety of strategies, instructional tools, and methods to demonstrate new understandings.
● Engagement: A variety of methods are used to engage students (e.g., provide choice, address student interest) and promote their ability to monitor their own learning (e.g., goal setting, self-assessment, and reflection)
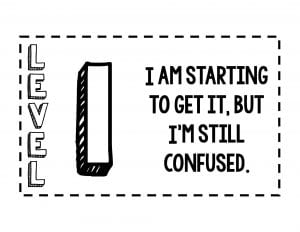
Where are you with your understanding of UDL?
 |
 |
 |
 |
For more information the the UDL Guidelines, check out CAST. And don’t worry, one small move leads to big change!
 Inference and Synthesizing
 Working to make a documentation record of our work throughout the novel, I have been taking pictures of our whiteboard and adding the images to a SMORE for Ghost Hawk. On the SMORE, I have been able to model taking the graphic organizer work and turning it into written response. This way, students can see the next steps they will be taking after they are comfortable with using the organizer.
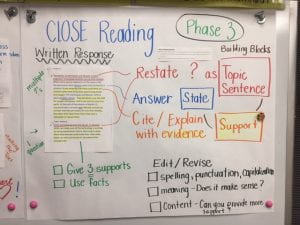
 To help my students with the concept of three phases of CLOSE reading, I decided to use the normal anchor chart from